
Enhancing AUTO1 Cloud Security Posture with Terraform Security Scanners
Introduction
At AUTO1, we rely on Terraform to manage our cloud infrastructure. And of course, we are trying to pay close attention to its security posture. Over time we realized that relying solely on reactive methods, such as AWS Config and Security Hub, to identify and combat misconfigurations in our AWS services wasn't sufficient. It was imperative for us to shift left in our infrastructure development cycle to avoid repeating the same misconfigurations over and over again. In this blog post, we'll be discussing the journey of how we implemented security scans for our Terraform code.
Goals and Success Criteria
Idea would be to introduce some sort of security tool, that would scan all of our changes introduced in the infrastructure codebase and report on security finding. Based on that we could eventually start to prevent merge of PRs that contain some of the most critical misconfigurations. That way we wouldn't have to chase the same Security Hun findings all of the time.
To ensure successful implementation of Terraform security scanning, we needed to address two key questions:
-
Are we fully prepared to incorporate Terraform security scanners into our daily operations, even if it means potential blocks on some of our changes?
-
If yes, then which one would be the best fit for our requirements?
To answer these questions, we had to formulate specific criteria that the security scanning tool had to meet.
| # | Our ideal terraform security scanner... | Importance |
|---|---|---|
| 1 | is able to perform various security checks on the terraform code for the majority of important AWS services (including custom checks: encryption, IAM, public resources, etc. | CRITICAL |
| 2 | can be integrated into our development cycle for different repositories via Github Actions | CRITICAL |
| 3 | can be run on self-hosted Github runners | HIGH |
| 4 | has capability to configure different conditions to fail or pass checks (for example severity of the finding) | MEDIUM |
| 5 | has capability to suppress findings directly inline in code | HIGH |
| 6 | has good readability of the scan results | MEDIUM |
| 7 | can be integrated into AWS Security Hub or AWS Inspector (or some other centralized view for analysis, like DefectDojo) | LOW |
| 8 | has an open source community version | HIGH |
| 9 | has good documentation, including mitigation recipes for found misconfigurations | LOW |
| 10 | should take as little time as possible to scan target modules | MEDIUM |
| 11 | can scan external terraform modules (local or on Github) | LOW |
| 12 | can scan single files, not only directories | LOW |
I think all of the criteria are pretty self-explanatory. Assigned 'importance' will come into play later, for now it just should be noted that of course chosen criteria and assigned values are mostly subjective and very team-dependent — for our specific case this outline was close enough.
With goals and criteria of PoC figured out, we had to round up some contenders.
Choosing contenders
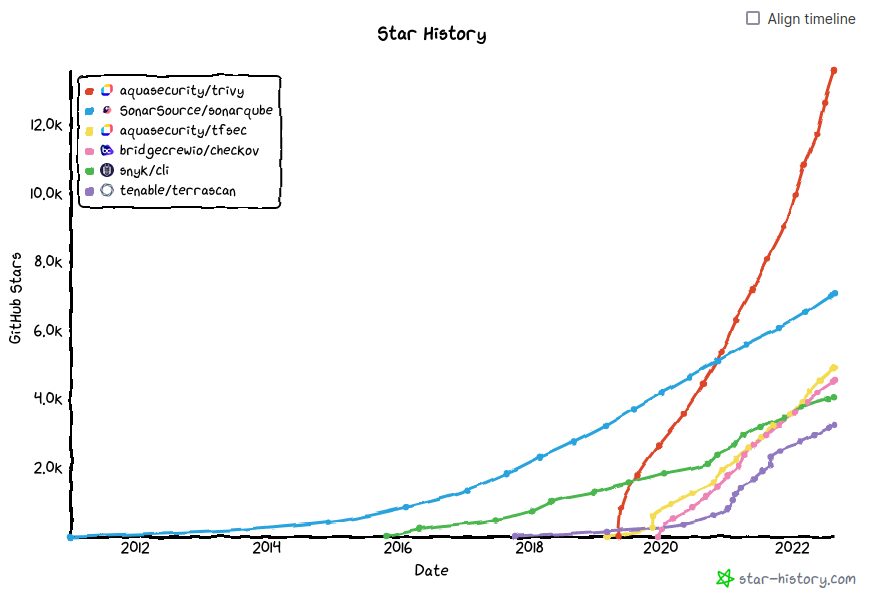
We started by conducting an initial assessment of the available Terraform security scanning tools. Based mostly on community adoption, we compiled a longlist of contenders, which included:
- checkov by Bridgecrew
- KICS by Checkmarx
- regula by Fugue
- snyk by Snyk
- SonarQube by SonarSource (made the list only because we already use it as SAST for our application codebase and it recently started to support terraform)
- terrafscan by Tenable
- tfsec by Aqua Security
- trivy by Aqua Security
Here it is important to know that PoC took place in the second part of 2022, so our observations and conclusions were made based on the versions of these tools that were available at the time.
The initial assessment was rather straightforward. It involved installing each tool, scanning a Terraform module that was part of our infrastructure, and evaluating the scan results. Based on the results of the evaluation (which basically boiled down to briefly looking at the produced report and comparing it to the results generated by other tools), we narrowed down the list to the following contenders:
- checkov
- KICS
- tfsec
The ones that didn't make the cut either:
-
were producing non-satisfactory scan results:
- regula — had just mediocre list of available security checks, hence not too many findings;
- SonarQube — only recently got capability to scan terraform and at the time of testing had only around of 30 security checks (shortlisted contenders each already had more than a hundred at that time);
- terrascan — strangest case of all. According to the community adoption should show decent results, but for some reason I couldn't make it to produce them. I still think that it might be the result of misconfiguration, although there isn't much to configure there, to be honest.
- turned out to be overkill for our use case — trivy actually can do a lot more than just to scan terraform code. Tfsec from the same vendor is a better pick for us. Not to mention, that it seems like under the hood trivy uses tfsec to scan terraform.
- had very hard usage limits introduced in the community version — snyk
At the same time all the tools that we chose to shortlist looked pretty great. So, now we had to test each of them properly in order to decide which one would win.
Preparations
To properly evaluate the shortlisted tools, we decided to integrate them into our main infrastructure repository as Github Workflows.
This way we would gather relevant statistics very quickly and at the same time get a taste of the new way of implementing changes.
Github Workflows is an automation tool that is integrated within the Github platform. These workflows allow you to automate a variety of tasks, such as building and testing your code, releasing software updates, and more. Workflows are defined in a specific file format called YAML, which is stored in your Github repository. The workflows are triggered by specific events, such as a code push or a pull request, and they can run a series of actions in response to these events. These actions can be anything from running a set of commands, to integrating with external tools and services.
Typical workflow in our case looked roughly like this:
name: tfsec
on:
  pull_request:

jobs:
  tfsec:
    name: tfsec
    runs-on: ubuntu-latest

    steps:
      - name: Checkout
        uses: actions/checkout@v3
        with:
          fetch-depth: 0

      - name: Get changed files
        id: changed-files
        uses: tj-actions/changed-files@v35
        with:
          dir_names: true

      - name: Install tfsec
        continue-on-error: true
        run: |
          wget -O - -q "$(wget -q https://api.github.com/repos/aquasecurity/tfsec/releases/latest -O - | grep -o -E "https://.+?tfsec-linux-amd64" | head -n1)" > tfsec
          install tfsec /usr/local/bin/
          tfsec --version

      - name: Setup SSH Keys and known_hosts
        env:
          SSH_AUTH_SOCK: /tmp/ssh_agent.sock
        continue-on-error: true
        run: |
          ssh-agent -a $SSH_AUTH_SOCK > /dev/null
          ssh-add - <<< "${{ secrets.TERRASCAN_SSH_KEY }}"

      - name: tfsec Security Scan
        env:
          SSH_AUTH_SOCK: /tmp/ssh_agent.sock
          TERM: xterm-color
        continue-on-error: true
        run: |
          for directory in ${{ steps.changed-files.outputs.all_changed_files }}; do
            echo "$(tput setaf 2) Currently scanning module: $directory"
            tfsec $directory --soft-fail || true
          done

      - name: Post scan message
        continue-on-error: true
        run: |
          cat << EOF
          If security scan found misconfigurations in the code,
          please either try to fix them or create inline ignore comments for the
          appropriate resources.

          Format:
          (Place comment before resource code block or in the offending line)
          #tfsec:ignore:<rule>

          Rule identificators are specified in the scan results.

          More about tfsecs format can be found here:
          https://aquasecurity.github.io/tfsec/v1.27.4/guides/configuration/ignores/
          EOF
Let's go over it bit by bit to explain what exactly is going on here:
name: tfsec
on:
  pull_request:

jobs:
  tfsec:
    name: tfsec
    runs-on: ubuntu-latest
In the beginning we need to define the name of the workflow ("tfsec"), its trigger (in our case — only opening or changing PRs) and where it will run. In this case it will run on Github Managed runners, but it is possible to integrate your own runners deployed, for example, in AWS — then we'd have to reference them using a specific name tag.
In this case we defined only one job with multiple steps.
Here they are:
    steps:
      - name: Checkout
        uses: actions/checkout@v3
        with:
          fetch-depth: 0
Pretty standard, we use another Github Action (provided by Github in this case) to checkout target repo.
      - name: Get changed files
        id: changed-files
        uses: tj-actions/changed-files@v35
        with:
          dir_names: true
Here is the attempt to optimize our process. So, obviously when we started this PoC, we already had a pretty sizable terraform repo on our hands. For that reason, it didn't make a lot of sense (and also would be kind of unfair to a person that wants to make some small change to a specific module) to scan the whole repo and report on it each time someone creates a new PR. So here we use another awesome action to limit our scan to only changed modules. dir_names option indicates that we get only names of the directories that hold changed files, not the filenames themselves. This is used here because tfsec expect scanning path to be a single directory. For tools, that can scan separate files, we would disable this option to optimize scope.
      - name: Install tfsec
        continue-on-error: true
        run: |
          wget -O - -q "$(wget -q https://api.github.com/repos/aquasecurity/tfsec/releases/latest -O - | grep -o -E "https://.+?tfsec-linux-amd64" | head -n1)" > tfsec
          install tfsec /usr/local/bin/
          tfsec --version
This one is pretty self-explanatory. We need to download and install the latest version of the required tool.
      - name: Setup SSH Keys and known_hosts
        env:
          SSH_AUTH_SOCK: /tmp/ssh_agent.sock
        continue-on-error: true
        run: |
          ssh-agent -a $SSH_AUTH_SOCK > /dev/null
          ssh-add - <<< "${{ secrets.TERRASCAN_SSH_KEY }}"
This one is actually pretty tool and environment specific. It's relevant for tools that can scan modules that are being sourced from Github repos. Here we allow runners to use previously created SSH key, authorized to pull those modules.
      - name: tfsec Security Scan
        env:
          SSH_AUTH_SOCK: /tmp/ssh_agent.sock
          TERM: xterm-color
        continue-on-error: true
        run: |
          for directory in ${{ steps.changed-files.outputs.all_changed_files }}; do
            echo "$(tput setaf 2) Currently scanning module: $directory"
            tfsec $directory --soft-fail || true
          done
Finally, we can scan code. We use a list of changed directories, found by one the previous steps, and just iterate through, launching the security tool to scan each one.
Last part would be just a message to hint at the next possible steps for the engineers. In our case it was just a link to the documentation.
One important thing. You might have noticed that almost in every step we use this option:
continue-on-error: trueIt was really crucial at this stage to not block work of the engineers under any circumstances. This option ensured that even if some step of the workflow would fail or produce security finding, it wouldn't block the PR.
Because we wanted to compare all three scanners simultaneously to ensure that our observations were always in the same context, we had to construct a workflow for each one and activate them in our repository. Workflows looked roughly the same with small adjustments specific for each tool. After implementation was done it was time for the team members to continue to write code, push PRs and that way generate more and more scan results. For those who were directly responsible for the PoC it was time to perform some tests against formulated success criteria based on accumulated statistics.
Proof of Concept
Based on the accumulated scan results we tried to estimate how well each tool complies with our requirements.
Boiled down results are listed below. We tried to make them at least a bit self-explanatory so we could be able to reference them in the future, when someone will inevitably ask: "Does anybody remember why we chose this scanner over that scanner?".
We listed previously defined criteria and assigned numeric value to their importance characteristic:
- critical — 1.0
- high — 0.75
- medium — 0.5
- low — 0.25
Then based on our observations we graded every tool, basically evaluating compliance of each tool to every criterion. Grades multiplied by importance got us numeric results that we could use to objectively compare contenders. Below are the results supplemented by the comments, intended to justify each grade. For better readability you can check out this Google sheet.
Results and Conclusion
In the end we chose KICS as our terraform security scanner. Honestly, I believe that we'd have chosen it even if it wouldn't score highest in our internal test rating (but it also helped to reach the decision, of course). Reason for that would be that basically with the same scanning quality as other just these two KICS's killer-features:
- great scan visibility provided in the form of PR comments and annotations (this is a special feature of this KICS Github Action);
- ability to scan only changed files, nothing else (instead of the whole directories).
made it the most appealing candidate. It is now integrated to all of our terraform repositories (more than a 100 in total). It scans every PR we make, reports on it and blocks them if any of the findings were classified with severity "high" (highest in the KICS terminology).
As for the initial goal — to make our infrastructure a bit more secure — I believe KICS has indeed assisted us with that quite well. Sometimes we just fix one small existing or newly introduced misconfiguration and go on with our day. But sometimes we find something that turns into an epic with dozens of tickets that cover hundreds and hundreds of our resources and services. Both scenarios are great and valuable in the end. Additionally, it spreads awareness across all of the DevOps team about available security options of various AWS services and in general more secure ways to use them (at least I really hope so). Taking all this into account, the effort was well worth it and I think we will continue to benefit from it further and further.
Thank you for reading!
Leveraging AWS Elastic Block Store for improved performance and faster build times.
How to setup monitoring tools on TV screens using Raspberry Pi

Sometimes elastalert returns unexpected results, sometimes it does not alert although one would...
